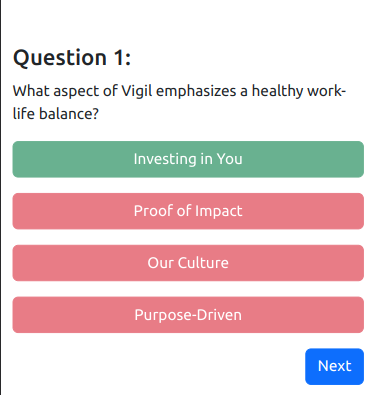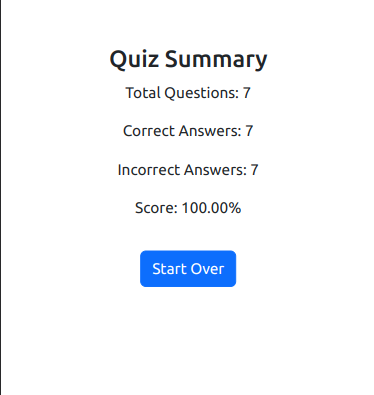
Welcome to an exciting journey into the heart of Vigil! In this interactive article, we’re going to leverage the power of Vue 3 and Vite to create an engaging quiz that tests your knowledge about Vigil. As you embark on this journey, you’ll not only learn about Vue 3’s capabilities but also discover interesting facts about the company. Get ready to blend Vue’s efficiency with your passion for Vigil as we create an interactive quiz like no other!
In this article, we’ll guide you through the process of building an interactive quiz application using Vue 3 and Vite. If you’re new to Vite, don’t worry – it’s a lightning-fast build tool for Vue projects. With this dynamic duo, you’ll not only craft an interactive quiz but also deepen your understanding of Vigil’s mission, values, and history. So, let’s dive into the world of Vue, Vite, and Vigil!
Before we begin, make sure you have the following prerequisites in place:
In this section, we’ll walk you through the process of setting up a Vue Single Page Application (SPA) using Vite – a lightning-fast build tool. This build setup will enable us to leverage Vue Single-File Components (SFCs) and enjoy a streamlined development experience.
Before we start, ensure that you have an up-to-date version of Node.js installed on your machine. Also, make sure that your current working directory is the location where you want to create your project. Let’s get started by running the following command in your command line:
npm create vue@latest
During the project setup, you’ll encounter a series of prompts that allow you to customize the features of your Vue project. Here’s a breakdown of these options:
<your-project-name>In this article, we’ll be using the following options:
vigil-quizOnce the project is created, follow the instructions to install dependencies and start the dev server:
cd
npm install npm run dev
Now that we have our Vue project set up using Vite, let’s enhance its visual appeal by integrating the popular Bootstrap 5 CSS framework. Bootstrap will allow us to create a polished and responsive design for our interactive quiz application, showcasing Vigil’s identity in a sleek manner.
Here’s how you can integrate Bootstrap 5 into your Vue project:
npm install bootstrap@5.3.1
import ‘bootstrap’ import ‘bootstrap/dist/css/bootstrap.min.css’
It’s essential to start with a clean slate. We’ll begin by tidying up the App.vue file, setting the stage for our interactive quiz experience. Additionally, we’ll set up routing using Vue Router to navigate between different views seamlessly.
Here’s how we’ll start shaping our project:
App.vue
<template>
  <RouterView id="app" />
</template>

<script>
import { RouterView } from 'vue-router'
export default {
  name: 'App',
  components: {
    RouterView
  }
}
</script>

<style>
#app {
  width: 100vw;
  height: 100vh;
}
</style>
index.js
import { createRouter, createWebHistory } from 'vue-router'

const router = createRouter({
  history: createWebHistory(import.meta.env.BASE_URL),
  routes: [
    {
      path: '/',
      name: 'home',
      component: () => import('../views/HomeView.vue')
    },
    {
      path: '/question',
      name: 'question',
      component: () => import('../views/QuestionView.vue')
    },
    {
      path: '/summary',
      name: 'summary',
      component: () => import('../views/SummaryView.vue')
    }
  ]
})

export default router
In the index.js file (where we set up our router), we’ve defined two routes. The first route, ’/’, corresponds to the HomeView component, which will serve as the landing page of our interactive quiz application. The second route, ‘/question’, is intended for viewing individual quiz questions, and it maps to the QuestionView component. Finally, the third route, ‘/summary’, corresponds to the SummaryView component, which will display the user’s quiz results.
In this step, we’ll transform the HomeView component to provide users with a welcome to the Vigil quiz. To kick off the quiz, we’ll introduce a button labeled “Start” that will direct users to the QuestionView component, where the quiz begins.
HomeView.vue
<template>
  <div class="d-flex flex-column align-items-center justify-content-center container text-center">
    <h2>Welcome to the Vigil Quiz</h2>
    <p class="lead">
      Get ready to learn more about this amazing company through our interactive quiz!
    </p>
    <router-link to="/question" class="btn btn-primary mt-3">Start</router-link>
  </div>
</template>

<script>
  export default {
    name: 'HomeView'
  }
</script>

When it comes to state management in Vue applications, one powerful option is to use Pinia. Pinia is a modern and performant state management solution. Here’s a quick example of how you can define a Pinia store for managing a quiz’s correct and incorrect answers:
import { ref } from 'vue'
import { defineStore } from 'pinia'

export const useQuizStore = defineStore('quiz', () => {
  const correctAnswers = ref(0)
  const incorrectAnswers = ref(0)

  function incrementCorrect() {
    correctAnswers.value++
  }

  function incrementIncorrect() {
    incorrectAnswers.value++
  }

  return {
    correctAnswers,
    incorrectAnswers,
    incrementCorrect,
    incrementIncorrect
  }
})
Once you’ve defined a Pinia store, you can use it in your components to access and modify the state, as we will do in the QuestionView component.
In this iteration, we’ll enhance the QuestionView component by separating the quiz questions and answers into a JSON file. This separation promotes better organization and maintainability of your quiz content. Let’s integrate this approach to provide a seamless and dynamic quiz experience.
questions.json
[
  {
    "question": "What drives Vigil's culture and work approach?",
    "choices": [
      "Competition and secrecy",
      "Profit above all",
      "Collaboration and communication",
      "Micromanagement"
    ],
    "correctIndex": 2
  },
  {
    "question": "What is Vigil's focus when it comes to its impact on the world?",
    "choices": [
      "Being anonymous",
      "Generating chaos",
      "Positive impact through technology",
      "Achieving personal goals"
    ],
    "correctIndex": 2
  },
  {
    "question": "What is unique about Vigil's approach to people and well-being?",
    "choices": [
      "Ignorance of individual needs",
      "Traditional office-centric model",
      "Remote-first company culture",
      "Complete disregard for well-being"
    ],
    "correctIndex": 2
  }
... Add more questions here
]
QuestionView.vue
<template>
  <div class="container mt-5">
    <h3>Question {{ questionNumber }}:</h3>
    <p class="question">{{ currentQuestion.question }}</p>
    <div v-for="(choice, index) in currentQuestion.choices" :key="index" class="mt-3">
      <button
        :class="{
          'btn btn-outline-primary btn-choice': !isAnswered,
          'btn btn-success btn-choice': isAnswered && index === currentQuestion.correctIndex,
          'btn btn-danger btn-choice': isAnswered && index !== currentQuestion.correctIndex
        }"
        :disabled="isAnswered"
        @click="handleChoice(index)"
      >
        {{ choice }}
      </button>
    </div>
    <div class="d-flex justify-content-end mt-3">
      <button
        v-if="isAnswered && questionNumber < totalQuestions"
        class="btn btn-primary"
        @click="nextQuestion"
      >
        Next
      </button>
      <button
        v-if="isAnswered && questionNumber === totalQuestions"
        class="btn btn-primary"
        @click="showSummary"
      >
        Finish Quiz
      </button>
    </div>
  </div>
</template>

<script>
import quizQuestions from '@/assets/questions.json'
import { useQuizStore } from '@/stores/counter.js'

export default {
  data() {
    return {
      quizStore: useQuizStore(),
      questionNumber: 1,
      totalQuestions: quizQuestions.length,
      currentQuestionIndex: 0,
      userChoiceIndex: null,
      isAnswered: false
    }
  },
  computed: {
    currentQuestion() {
      return quizQuestions[this.currentQuestionIndex]
    }
  },
  methods: {
    handleChoice(index) {
      if (index === this.currentQuestion.correctIndex) {
        this.quizStore.incrementCorrect()
      } else {
        this.quizStore.incrementIncorrect()
      }
      this.isAnswered = true
    },
    nextQuestion() {
      if (this.questionNumber < this.totalQuestions) {
        this.questionNumber++
        this.currentQuestionIndex++
        this.userChoiceIndex = null
        this.isAnswered = false
      }
    },
    showSummary() {
      // Navigate to the summary component with the correct and incorrect answers count
      this.$router.push({ name: 'summary' })
    }
  }
}
</script>

<style scoped>
.btn-choice {
  width: 100%;
  white-space: normal;
}
</style>
Now let’s finish the quiz by creating the SummaryView component. This component will display the user’s quiz results and provide a button to restart the quiz.
SummaryView
<template>
  <div class="container mt-5">
    <h2>Quiz Summary</h2>
    <p>Total Questions: {{ totalQuestions }}</p>
    <p>Correct Answers: {{ quizStore.correctAnswers }}</p>
    <p>Incorrect Answers: {{ quizStore.incorrectAnswers }}</p>
    <p>Score: {{ ((quizStore.correctAnswers / totalQuestions) * 100).toFixed(2) }}%</p>
    <router-link class="btn btn-primary mt-3" to="/">Start Over</router-link>
  </div>
</template>

<script>
import { useQuizStore } from '@/stores/counter.js'
import quizQuestions from '@/assets/questions.json'

export default {
  name: 'SummaryView',
  data() {
    return {
      quizStore: useQuizStore(),
      totalQuestions: quizQuestions.length
    }
  }
}
</script>

<style scoped>
.container {
  text-align: center;
}
</style>
As our Vigil quiz application comes to life, we’re not stopping at development. We’re committed to ensuring that our code is robust and reliable through comprehensive unit testing. In this section, we’ll introduce you to Vitest – a powerful unit-test framework designed to seamlessly integrate with Vite projects.
Vitest leverages Vite’s dev server to transform files during testing, resulting in a streamlined testing experience. It seamlessly shares configuration with your Vite application and boasts a plugin API that promotes first-class integration with Vite. This combination ensures a blazing-fast test execution and maintains a consistent DX (developer experience) from development to testing.
Whether you’re building a Vite project or exploring alternatives for other projects, Vitest stands as a powerful test runner. Its lean architecture and strategic dependencies contribute to its lightweight nature, ensuring a quick and efficient testing process.
Now let’s create a test suite for our HomeView component. We’ll use Vitest to test the component’s rendering and ensure that the h2 and p elements contains the correct text, also that we have a button with text equals to “Start” and when this button is pressed it navigates to the QuestionView component.
import { describe, it, expect } from 'vitest'
import { mount } from '@vue/test-utils'
import { createRouter, createWebHistory } from 'vue-router'

import HomeView from '@/views/HomeView.vue'
import QuestionView from '@/views/QuestionView.vue'

// Create a mocked router instance for testing
const router = createRouter({
  history: createWebHistory(),
  routes: [{ path: '/question', component: QuestionView }]
})

describe('HomeView', () => {
  it('should render the home view', () => {
    const wrapper = mount(HomeView)
    expect(wrapper.find('h2').text()).toBe('Welcome to the Vigil Quiz')
    expect(wrapper.find('p').text()).toBe(
      'Get ready to learn more about this amazing company through our interactive quiz!'
    )
    expect(wrapper.find('button').text()).toBe('Start')
  })
  it('should navigate to the question route when the button is clicked', async () => {
    const wrapper = mount(HomeView, {
      global: {
        mocks: {
          $router: router
        }
      }
    })

    // Simulate a click on the button
    wrapper.find('button').trigger('click')

    // Wait for the navigation to complete
    await router.isReady()

    // Check if the router was navigated to the '/question' route
    expect(router.currentRoute.value.path).toBe('/question')
  })
})Let’s break down the test suite we created for the HomeView component. First, we imported the describe, it, and expect functions from Vitest. Then, we imported the mount function from @vue/test-utils, which allows us to mount the HomeView component for testing. Next, we imported the createRouter and createWebHistory functions from vue-router to create a mocked router instance for testing. Finally, we imported the HomeView and QuestionView components.
In the first test, we mounted the HomeView component and used the expect function to verify that the h2 and p elements contain the correct text. We also verified that the button has the correct text. In the second test, we mounted the HomeView component and passed a mocked router instance to the global mocks option. Then, we simulated a click on the button and used the expect function to verify that the router was navigated to the ‘/question’ route.
In this article, we’ve explored the power of Vue 3 and Vite by building an interactive quiz application. We’ve also learned about Vigil’s mission, values, and history. We hope you enjoyed this journey into the heart of Vigil and that you’re ready to take your Vue 3 and Vite skills to the next level!